Tuesday, March 8, 2011

How to properly set up speakers for a surround sound system

Once you have connected all of the audio and video cables to the surround sound receiver, you will need to run speaker wire to the spots where the speakers are going to go.

The center speaker should go either above or below the television directly in front of you. If you are using a projector I recommend putting the center speaker behind the screen, but make sure you have a screen that does not block sound.

The left and right front speakers should be placed in between 22 and 30 degrees from your listening center (where you will be sitting) on each side.

If you have a 7.1 or 9.1 surround sound system you will need to set up your front height speakers, they should be at the same angle as the front left and right speakers only higher up on your wall, to make the sound seem like it is coming from the ceiling.

The surround sound speakers in the back are placed differently depending on the system you have. If you have a 5.1 channel surround sound system the rear left and right speakers should be placed behind you in between 135 and 150 degrees.
If you have a 7.1 or 9.1 channel system there are four rear speakers to place. The surround right and left speakers should be placed at a 90 degree angle on both sides of you, and the surround back left and right speakers should be placed behind you between 135 and 150 degrees.

The sub-woofer can be place anywhere in the room, if set up properly you should not be able to tell where the sub-woofer is located. The sub-woofer should not produce too much bass to the point where it sounds like there is an earthquake in one corner of your room. For placement ideas here are some things you can try: set it next to the T.V., if it is not giving the sound you want put it up against a wall, if you still need a difference in sound place it in a corner. Each position can give you different levels of bass. Another good idea is to purchase a better sub-woofer cable than the one that came with your system, this will greatly improve the sub-woofers sound.

Sunday, March 6, 2011

Danish Butter Cookies (Haakon Kager)

These are one of my favorite cookies. They are very easy to make, and are great tasting.
Ingredients:
1 cup softened unsalted butter
1 cup sifted powdered sugar
2 cups sifted flour
a pinch of salt
half a teaspoon vanilla extract

Steps:
1. Mix the powdered sugar, vanilla, and butter in a bowl.
2. Add flour, and a pinch of salt and mix all together.
3. Now refrigerate mixture until it firms up.
4. Option 1, you can roll out mixture into a log and cut into slices.
4. Option 2, you can form little balls and run a fork across the top of each ball to create a lined design.
5. Bake in a 350 degree oven for 8 min. or until golden brown.
6. Wait until cool, serve and enjoy.


Thursday, March 3, 2011

Panini Sauce Recipe (with pesto sauce recipe)

This panini sauce recipe is great to put on any sandwich before cooking in a panini press.

The ingredients you will need are:
Three tablespoons of tomato paste
A cup of mayonnaise
Four tablespoons of Pesto Sauce

Steps:
Take three tablespoons of tomato paste and mix with a cup of mayonnaise in a small serving bowl.
Next, take four tablespoons of pesto sauce and mix into the bowl until well blended and use.

Apply this sauce to any sandwich before it is placed in a panini press and it will add a great tasting flavor.

To make the pesto sauce follow the directions below.

The supplies you will need are:
A food processor
A serving bowl

The ingredients you will need are:
Basil...........................................half pound
Olive Oil.....................................2/3 cup
Pine nuts (or walnuts)..................two tablespoon
Romano cheese (or Parmesan)....3/4 cup
Salt.............................................a pinch
Pepper........................................a pinch
Garlic..........................................five cloves

 Steps:
1. Cut garlic into pieces and put in food processor with nuts.
2. Pulse the processor until the garlic and nuts are somewhat mixed together.
3. Add in basil pulse processor a few seconds.
4. Next add a little olive oil and pulse processor.
5. Add in a little Romano cheese pulse processor.
6. Repeat steps 4 and 5 until ingredients are completely used.
7. By now it should have a sauce type texture, so it is time to add the salt and pepper.
8. Finish mixing in the processor and taste, and add any extra garlic if necessary.

For other panini recipes click here

Sunday, February 6, 2011

What to look for when buying a new T.V.

The first thing to look for when buying a T.V. is the brand name. You will want to chose one that is well known. The best and most reliable T.V.s out right now are, Samsung, Panasonic, and Sony. They tend to be a little more expensive than the others, but they are built to last and give the best picture.

Get yourself a T.V. here!

T.V.s come in many different sizes and specifications. I will explain them.


Size: You can choose any size that you want, it is all up to you. Usually the bigger the T.V., the farther back you must sit from the screen to view the optimum picture. Make sure the T.V. is not too big for the room.

Resolution: Today's T.V.s have resolutions starting from 480i, 480p, 720p, 1080i, to 1080p and beyond.
If the T.V. has 480i or 480p it is not considered a high definition T.V. If the T.V. has 720p, 1080i and 1080p then it is a high definition T.V. Typically high definition T.V.s are separated into two sections at most retail stores; the 720p T.V.s that can support 1080i and the full 1080p high definition T.V.s. So witch type is better? It all depends on what you will be using the T.V. for.

If you want to use the T.V. for watching standard definition programing or high definition programing, or regular DVD movies than a 720p T.V. will be all that you need.
If you want to use the T.V. as a computer monitor, or to watch Blu-Ray movies, access high definition programing or to play video games using the new systems (PlayStation 3 or X-Box 360 ) you will want the 1080p resolution. This level of resolution will give you the best possible picture, but they are typically more expensive.

The new 4k resolution T.V.'s are the highest resolution out right now, but there is not much material that can use the full 4k abilities, but the best is the best if your willing to pay.

HDCP (High-Bandwidth Digital Content Protection)
If you plan on watching Blu-ray movies make sure your T.V. has HDCP or the picture will be very grainy, or not even work. If your T.V. has an HDMI port then it is more than likely that your T.V. is HDCP compliant.

Contrast Ratio: The higher the contrast ratio the better. Contrast ratios are described as 100,000:1 or 1,000,000:1 (and many more). This tells you how dark the blacks will be and how bright the whites will be. So the higher the ratio the better.

Hertz: T.V.s start from 60htz, 120htz, 240htz and up to 600htz. The more hertz a T.V. has the more vibrant and smoother the picture looks when there is a lot of movement on screen. A higher refresh rate is especially needed when watching 3D. The more hertz the better, but the price of the T.V. goes up.

24p and 60p: T.V.'s are getting more and more advanced as time goes by, the newest feature T.V.s have is 24p and 60p. When film is being recorded it is recorded at a 24p frame rate, but most T.V.s can only play at a 60p frame rate, which means the film will have to unconverted disrupting the picture a little bit. If you are looking to get the best picture possible from a T.V. try to buy one that has the ability to play at a rate of 24p. (note: you will also need a blu-ray player that can output 24p)
For more information here is a great link that explains this quite well.

The different types: LED, LCD, Plasma, DLP, are all types of high definition T.V.s.
LED T.V.s use the least amount of energy and last twice as long because they run cooler. They are also the thinnest type of T.V.
LCD are the most common on the market today. They are dependable and relatively thin.
PLASMA are not as dependable as LCD or LED, but are still good. Plasma T.V.s are especially good for watching 3D.
 

DLP T.V.s, I believe are the worst because they are not that dependable. You can not see the picture very well in a lit room, or when just standing off to the side.

LED, LCD, and DLP T.V.s will have any where from 60hrtz to 240hrtz. Plasma T.V.s will have the high hertz (600hrtz).
LED T.V.s usually have the highest contrast ratio.


Wifi: Some newer T.V.s have WiFi that allows you connect to the internet. Each T.V. will list their features.

Conclusion:
I recommend staying away from DLP T.V.s. All of the other types are your preference based on performance.
If you will be getting a 3D T.V. Plasma is the best type of T.V. because it has a high refresh rate needed to prevent "ghosting". I believe Panasonic makes the best plasma T.V.s.
Stick with name brands, Samsung, Sony, and Panasonic are among the best.
Wifi is cool to have but not needed.
Try to get the highest resolution, contrast ratio, and hertz that your price range allows.

Monday, January 31, 2011

DIY - How to make a cold smoker

Cold smokers are used to cook all sorts of meats and cheeses. The first thing you will need to do is gather the right supplies. Making one can be very simple.

Supplies:
A grinder, and a drill with drill bit (size bit is mentioned in directions)
aluminum foil
one number 10 can (it is basically a giant bean can)
an electric charcoal starter (some use a soldering iron but they don't work as good)
you will also need a place to cook the food, you can use a barbecue,or whatever you like, i use a gas smoker that never really put out a good amount of smoke until i made this, now it works great!


Directions:
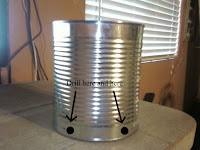
1. First open the number 10 can with a can opener and remove what ever is inside (beans or whatever) and wash it out.
2. Now get your charcoal starter and figure out what size hole you will need to make. Measure the width and thickness of the heat tubes.
3. Once you find the measurements of the charcoal starter, you need to find a drill bit that is a little bit thicker than the thickness of the heat tube on the charcoal starter.
4. With the correct size drill bit, drill a hole in the can towards the very bottom. then drill another hole at the same width of the charcoal starter away from the first hole.
5. Now we will use a grinder to cut the remainder of the can in between the two drilled holes, creating a rectangular opening that the charcoal starter can fit in.

Test:
To test the smoker, place the charcoal starter in the can through the cut slot.
Place the can and charcoal starter in your barbecue or whatever you are using.
Now fill the can with flavored wood (any you would like).
Next plug in the charcoal starter and cover the top of the can with aluminum foil but make sure to leave a little opening for the smoke to travel out from.(i didn't put on foil for the picture, but it really does help when you want to control the smoke)
As soon as you see smoke coming out of the can you can unplug the charcoal starter unless using wood chips soaked in water then you will need to leave it plugged in a while. You want just the right amount of smoke, but that is up to you.
Close your barbecue and you will be good to start smoking.
Note: since this is a cold smoker you can throw the power cord into the barbecue and it will not get ruined, or if you want to cut a hole in your barbecue for the cord to go out; then you can use it as a hot smoker as well, it is up to you.
Smoking:
Place your newly made cold smoking can at the bottom of your barbecue on the opposite side of where your food will cook. make sure all of the vents on your barbecue are closed except the one closest to your food.
This way all the smoke flows through your food and then out.
Now you can place cheese and different meats on the rack in your barbecue close to the open vent and you have your own home made cold smoker that makes some great tasting food.

Links:
here are two links that describe the different types of wood you can use with different types of food.
http://www.cbbqa.org/wiki/index.php?title=BBQ_FAQ:_Wood_for_Smoking
or
http://www.deejayssmokepit.net/Woods.htm

Build this at your own risk, the use of sharp tools are required.