Wednesday, July 18, 2012

DIY - Restoring Headlights

A lot of cars have headlights with sun damage, you all know what they look like. They are an ugly shade of yellow and don't produce much light output.
So here is how we fix them...
For headlights that are not very damaged, follow STAGE 1
For headlights with apparent mild damage, follow STAGE 2
For headlights with major damage, follow STAGE 3

STAGE 1
Wash your clear lenses. 
Completely dry with towel.

Polish them by hand using a microfiber towel and Meguiar's Plastx.
To keep from future yellowing, apply a wax or a headlight protectant wax. 
STAGE 2
Completely wash your yellowing lenses. 
Completely dry with towel.
Tape off the paint around the headlight so you don't damage it. Opening the hood will make it easier.
Once the paint has been taped off you will now need to wet sand the lenses. To wet sand, make sure you use 2000 grit sand paper. (you can also start with 1000 grit sand paper and then 2000 grit to remove slight damage quicker)
Wet sand means sanding with the sand paper that is wet at all times.


After the lenses have been sanded you must polish them to perfect clarity. To do this, we will need a drill, Mother's power ball, and Meguiar's PlastX.

Attach the power ball to the drill and apply PlastX to the lens, polish until the lens is completely clear. When finished the lenses will look brand new and allow the light to completely shine through.
To keep from future yellowing, apply a wax or headlight protectant wax.

 STAGE 3
Completely wash your severely damaged lenses
Completely dry with towel.
Tape off the paint around the headlight so you don't damage it. Opening the hood will make it easier.
Wet sand the lenses.
Depending on how damaged they are you may need to start with a grit as low as 500 and work your way up, but where you start is up to you and depends on damage.
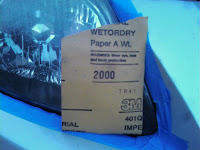


Available sandpaper grits:
500
600
800
1000
1200
1500
2000
2500
3000
Wetsand in only one direction for every grit.
For example, 500 grit left to right, 600 grit up and down, 800 grit left to right, and continue alternating until you are done.
You are finished with a grit level when the scratches are all going in one direction.

Because you have had to remove a bit of material to fix your damaged lights, we will not be polishing them, but instead degreasing and applying a coat of UV protectant clear coat paint.
Duplicolor Headlight Restoration Kit HLR100 :
This kit contains both the degreaser polish and UV protectant paint.
The reason we don't need to polish is because we are using paint and the paint will fill the fine scratched left behind and also provide something for the paint to attach to.
The end result will be completely clear and brand new looking.

Follow the directions in the kit.
All information is advise and I am not responsible for what you do on your own.

Friday, May 18, 2012

Smoked Cheese

 A lot of people have been wondering, "how do you smoke cheese?"


First of all, you must cold smoke cheese. In order to cold smoke cheese you must use or build your own cold smoker. You can build my cold smoker here, or an easy way for a quick temporary cold smoking device is to use a soda can smoker.

A soda can smoker can be made by first cutting the top off of a empty soda can and putting a hot coal in the bottom. Next you can choose any flavor wood you would like to use to flavor your cheese, and fill the remainder of the can with the wood. Seal the can with a piece of aluminum foil with holes poked in the top, this ensures that the wood will not have enough air to catch fire, just enough to keep smoking.

After you have chosen your type of cold smoker you wish to use place it on one end of your existing smoker or BBQ and place the cheese on the other side. Make sure all the vents are closed except for the ones on the side where the cheese is. Leave the cheese for about 3 to 4 hours if yellow cheese and 1 to 2 hours if white cheese, and it should be perfectly smoked. Remove the cheese from the grill, put it in a zip lock bag and leave in a refrigerator overnight to allow the cheese to really soak up the smoke flavor, another option is to vacuum seal the cheese once smoked and leave it in the fridge for 2 weeks and the smoke flavor will disperse throughout the entire block of cheese.

Sunday, February 19, 2012

Diffent types of Light

There are many different types of light available for use. The main three I will be talking about are; Incandescent/Halogen, florescent and L.E.D. 


Warm white vs. cool white
Warm white light recreates the look of incandescent light bulbs (a yellowish look), where as cool white is very white.


Incandescent/Halogen light bulbs are the standard light bulbs that have been used for years and are still being used. Halogens save a little bit more electricity than incandescent bulbs but are still the least efficient than the other two. These lights are very inefficient, they use a lot of energy to produce light. In a place like a car this may not matter, because the electricity is available as long as the vehicle is running.

Fluorescent light bulbs are more efficient and a way of reducing electricity cost.  This type of bulb can save up to 80% on light bulb cost, but they contain harsh chemicals that can be dangerous if the bulb is broken. Available in warm white and cool white. These bulbs are typically not found in most cars.

L.E.D. bulbs are the most efficient light bulbs of the three. They are relatively new, so they are the most expensive. These light bulbs can save up to 90% of light bulb electricity cost, and they last the longest. They are also safe for your home and shock resistant, so they are more durable than other bulbs for use in cars. Available in warm white and cool white.

For home use, I would recommend using L.E.D. light bulbs where ever possible, and fluorescent for when you can not use L.E.D. This light set up will be the most efficient and provide a great light output for the cost. You may have to pay extra, but they save you money over time.

For car use, I would recommend using L.E.D. in every place interior and exterior, except for headlight use. L.E.D. will give you more light output than the stock light bulbs while still using less electricity and are instant on/ instant off which makes other drivers see your lights sooner, which results in safer driving.

Wednesday, February 15, 2012

How To Clean And Maintain Your Paintball Marker

Cleaning notes: This is a general explanation for use with most paintball markers. If you are looking for an in depth do it yourself gun specific cleaning this is not for you.

Caution before you start, remove ammo and propellant. For example remove the co2 tank and paint balls. It is also a good idea to keep the gun on safe.

If you have ever used your paintball gun during a full day of play or even one game in some cases, your gun may have been shot, gotten dirty, or have broken paint inside it. This guide will help you clean your gun for storage or in preparation for the next game. NOTE: paintball guns should be cleaned after each day of use so that the internal parts do not get gummed up or stuck, and then would be in need of repair.


1.) First of all to clean the outside of the gun, you will need to clean any dirt or paint off of the outside of the gun using a damp paper towel (caution: if your gun has electronics do not get any water near them), then follow up and dry with a dry paper towel.

2.) Once the outside of your marker is clean, proceed to remove the barrel and squeegee or clean by sliding a wet paper towel down the barrel followed by a dry one. It is much easier to use a squeegee and I recommended you do so, it is also great to have one on the field when you brake paint in the barrel while playing. (NOTE: some guns may have the ability of cleaning the barrel without removing it from the gun (For example, through the hopper feed neck.)

3.) Next with the barrel off, use a paper towel to clean the area where the barrel screws on to the marker, and the front of the bolt. Some guns it is very simple to remove the bolt completely and clean the entire upper part of the marker.

4.) After, remove the paintball hopper and check to see the inside is clean, if not clean with water and set aside for it to dry, speed up drying with a dry paper towel. With the hopper off, use a paper towel to clean the neck where the hopper slides on, the top of the bolt, and the bolt area when it is in the cocked position.

5.) Lastly, put about five drops of paintball gun oil in the hole where the co2 tank screws on and then fire a few shots. What this will do is lubricate all of the moving parts and finally your marker is ready for storage, or you have just prepared it for another round of play.